Tag: Photography

I probably developed your film

I probably developed your film

Kisco Photo Service

If you lived in Columbus, Ohio in 1960 and took your film “to the drugstore” to be developed, it probably passed through my hands. My first major summer job was that year: I worked for Kisco Photo Service in a small building at Goodale and High St. This was essentially a family business owned by Mr Kissinger (I think) and more or less managed by his son in law, the smooth-talking Bill Smith. I seem to recall there being jokes along the line of “I wonder whose Kissinger now?”

Kisco Photo Service had a network of drug stores they serviced throughout Central Ohio. Their drivers picked up the film from these stores and dropped off the negatives and prints a couple of days later. While most of their business was still black and white printing, they did process Kodacolor and print it. They did not handle slides, but probably sent any out to another lab.

I was an avid photographer all through high school and had my own darkroom, where I did my own developing and printing: mostly black and white, but Jeff Luce and I got together and processed and printed some color from time to time. I had spent afternoons and Saturdays of my senior year as a darkroom assistant for Al Lupidi photography and Longview and High.

So, when looking for a summer job, when Al’s summer business didn’t warrant help, I took the bus down to Kisco with a resume in hand and talked myself into a summer job. As I recall, seniors got out of school nearly a week before our graduation and all-night party, so I started work that week and took off two days around graduation the following week. Since we were a 1-car family and my father mostly drove to work, I rode my bike down to Clinton School (back where this all started) locked my bike to a bike rack there and walked across High Street (or took the underpass) to catch the bus.

My boss was Billy Hillscher, who oversaw operations, and he introduced me to Ellen who worked developing the black and white film. I became her assistant, and since I already knew how to open film rolls and cartridges I was that far ahead of where they expected.

The film developing took place in a long, completely dark room, with a machine that moved the film through four tanks and then out through a light lock to a drying room, where the film was taken to be printed.

We stood at the beginning of the tank and received film and the original envelopes tucked into clips in a wooden bar that would hold five or six rolls of film. The film was loaded onto the bars outside our room, by intake people, who placed the bars in a rotating 3-sided lazy Susan. When they had loaded enough bars, they knocked on the wooden housing and rotated the film into our dark room.

Here we placed the bar on the front of the developing machine, opened each film roll or cannister and clipped to film to the bar, and attached a weight to the bottom end of the roll. This was tricky in the dark. Roll film was taped inside a black paper backing, so you had to unroll the trailing end (since it was now reversed), clip it to the bar, pull down the paper, and tear through the tape at the other end. The 35mm cannisters were actually easier: you just rapped the long end on any hard surface and the other end popped off, so you lift out the spool of film. (This doesn’t work anymore. Kodak decided people were reloading them, so now you need a bottle opener to pull off the end, which destroys the cannister.)

35mm cannister and 120 roll film

Film taped to backing

Then we moved the bar from the holding position to the machine’s moving chain, that raised the bar up about 5 feet, moved it forward and lowered the film into the film developer. The bars sat in notched on two chains on either side of the tank, that slowly moved forward about one notch every 30 seconds, coming to the end of the developing tank in about 8 minutes. At the point, the bars were lifted on the chain up and down into the second tank which was a rinse to stop the development process, and then on into the third tank which contained the film fixer or “hypo,” (actually sodium thiosulfate) which dissolved the parts of the film that contained no image, essentially the black areas in the photo. The film went up and down into the fourth rinse tank and then out into the drying room.

“Fine Grain” developing

Occasionally, someone would request “fine grain developing.” What each actually happened was that we put all of those rolls requesting fine grain on a single bar, and when the film came down into the developing tank, we reach in and moved the film ahead two notches in the tank, so they would be developed a bit less. But since this was the same developer, there was a little hooey going on here, and the company charged the customers extra for this hooey.

However, in those days, most people were still using Kodak Verichrome Pan, which was a film designed for amateur photographers who used box cameras and other simple devices. The film had such a wide exposure latitude that it was pretty impossible to screw up your film exposure (or development). We also saw some Tri-X pan which was more of a professional quality film, and more light-sensitive.

Most of the film we handled was 120 or 620, which produce 12 6×6 cm negatives on a roll, or 127 which produced 12 smaller images on narrower film. We also had a significant amount of 35mm film come in, mostly 20 exposure rolls, but when we got 36 exposure rolls, these were longer than the 4 foot depth of the developing tanks, so we had to loop the film down and up the adjacent clip on the film bar so it didn’t hit bottom. The people that attended the film in the drying room unhooked one end and attached a weight so the film would dry without a water spot in the middle where the loop had been.

When the film was dry, it went on to the printers, who were a series of (mainly) women who sat at little consoles and centered each image manually using a little display, and then press “Print,” which exposed the next few inches of a roll or photo sensitive paper, entirely enclosed in the printer console, so they could work in an illuminated room.  The rolls of paper were developed within each console, I think and then cut into individual pictures. The printer people had some control over the exposure of the printing paper and if they mis-guessed, this was caught when the prints were cut up and those negatives were reprinted.

Trouble

You may think that this idyllic life was all there was to processing film, but of course, there were always snags. Once and a while, Ellen and I would have loaded all the film that had come in into the machine and went out into the light and had a coffee (her) or a Coke (me). But sometimes we’d be standing there when we heard a terrible CLANKA CLANKA CLANKA coming from the machine and we ran back into the dark room. Ellen pulled out a little flashlight with a green filter over the lens and we looked for what was stuck. Usually, we had to turn off the machine and rescue the film bar that had gotten stuck diagonally across the chains, and then hurriedly turn it back on, perhaps advancing the film to make up for the amount of time it had already been in the developer. If we acted quickly, nothing was lost.

Kisco had two drivers, Jimmy and Chuck that went out to all the drugstores on their route and delivered and brought back film in batched several times a day. But there was one time a day, usually around 10:30 or so, when there would be a frantic knocking on the film door and the word “Whiston” being shouted at us.

It turns out that this referred to Whiston Pharmacy in Mount Horeb, Ohio. Apparently, they had an arrangement with Whiston that their film would be back the same day, perhaps because of the distance and the route the driver drove, and we had to drop everything and move film to Whiston to the front of the line, so it would get to the printers and back to the drivers in a few hours. Amazingly enough, this pharmacy is still in business some sixty years after I worked at Kisco.  Kisco is, of course, long gone.

Color

Color negatives and one print

The color developing and printing was a much smaller part of the business. All the color film was developed personally by Hillscher, so there couldn’t have been that much. There were three color printing consoles for making the final prints. These were operated by women who came in later, because of how long developing the color film took, and, incidentally, dressed a lot better than their black and white printing colleagues.

I did get an employee discount to have my own film processed, and I had recently gotten my first electronic flash or speedlight, or “stroboflash” in older argot. So, I shot a roll of color to try out my new toy, and brought it in. I remarked to Ellen that I hope the strobe exposed film would come out OK.

Well, for this, I got called on the carpet, because, not realizing that the pictures were exposed with an electronic flash, they printed them assuming I had use regular flashbulbs. Now, regular flashbulbs had a much warmer color to them then do electronic flash shots, which tend to have a bluish cast. Hillscher was furious with me that I hadn’t marked them “strobe exposed,” and when he saw the first prints, he had to have them all done over. Not only was I being berated for something I never heard of before, but it was clear this stuff was all pretty new to them, too.  I think I did one more roll with Kisco with mixed results and decided I would be better off sending my color prints to the nearby Kodak processing lab in Findlay.

Clarinet

I played clarinet all three years in the North High School band but was worried that when I got to Oberlin College, I wouldn’t be accomplished enough to join the Oberlin Concert Band. Several other clarinetists had moved on to take lessons with Dr Don McGinnis at the OSU school of music.  So, I asked my mother if she could call him during my workday and see if he could take me on for a few lessons that summer. Well, as soon as she told him that I was going to Oberlin, he exclaimed: “Oberlin! That’s my school.” And I was in.

So, on Wednesdays, I took my clarinet to work and then took the bus up to the OSU campus. I walked over to the music school for my lesson. He was great, and improved me quite a bit, and I did get to play in the band in college.

But one Wednesday, Hillscher asked me if I could clean the stockroom, which amounted to mopping the floors and waxing them.  Needless to say, this wasn’t an elegant operation, and I arrived for my lesson covered with schmutz! But he let me in anyway.

I spent a couple of days later in the week, inventorying their stockroom. I suspect that few of the others really were great readers, but it wasn’t too difficult.  Thanks? No, not really.

Taking my leave

When I accepted the job offer, Bill Smith had promised me a raise once I had become experienced. That never happened, and when my parents asked if I wanted to come on vacation with them in August before leaving for college, I agreed and gave Kisco my notice. I know Kisco had wanted me to work a bit longer, but I felt it was time to get out, so I did.

The next summer, I help paint lines on the streets of Columbus, but that’s another story.

My life in cameras

My life in cameras

I’ve been interested in photography from a really early age, and here is why it happened.

The Wheaties camera

wheaties2 cropped


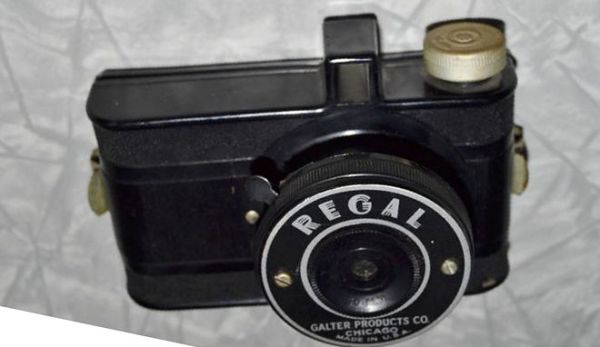
I first got interested in taking pictures when I found I could get an actual working camera for 55 cents and a Wheaties boxtop. I was about 7 years old and this was pretty exciting for me. Mine used 127 film which you then “took to the drugstore” to have processed. You got back little contact prints about 1” x 1.5”. I’m not sure if enlargements were yet available, but enlargements from such a cheap camera would have been pretty awful.  Some years later, I actually had a summer job at the local photofinisher that serviced all those drugstores. But that’s another story.

These promotional cameras were made by Regal Galter of Chicago, and were available with various nameplates. While they were little more than toys, they did take actual pictures and I took a lot of pictures, especially on vacation or when we took visitors to nearby Niagara Falls.

This was really a learning experience, and I am sure most of my pictures were terrible, but every mistake led to more chances to learn. Of course, the camera had no settings for shutter speed or lens opening. And, in those days, the only 127 film type was Kodak Verichrome Pan, a very forgiving, wide latitude film that produced reasonable pictures over a wide variety of lighting conditions. This was, of course, an outdoor, daylight camera. Inside shots and flash pictures were still in the future.

The Brownie Hawkeye

hawkeye2 hawkeye flash

When I was about 11, and in about 6th grade, my parents surprised me with a wonderful new camera, the  Kodak Brownie Hawkeye. It used 620 film, producing negatives that were 2 ¼ x 2 ¼ inches (or 6 x 6 cm). The bakelite Brownie had a bright prism waist-level viewfinder, and there were a number of types of film available for it, including Verichrome Pan, Tri-X and Kodacolor. The flash attachment used flashbulbs, of course, and while you could use ordinary white flahsbulbs you could get blue flashbulbs to simulate the outdoor color balance for outdoor Kodacolor. (Color film came in outdoor and incandescent in those days.) Contact prints from these 2 ¼” square negatives were decent sized, and the camera quality was sufficient to stand enlargement to “oversize” prints if you wanted to pay for it.

The Brownie Hawkeye was made from 1949-1961, with the flash model introduced in 1950. It was the most popular Brownie ever made, and you can still find them around pretty easily. They make good stage props and there was a recent men’s clothing ad where the model was using a Brownie Hawkeye, but was foolishly holding it up to his eye!  The original Brownie Hawkeye cost $5.50 and the flash model $7.00!

This Brownie went with me on all our vacations and I even got to take it to school on occasion to snap pictures of my friends.

As I moved on into Junior High School, I became interested in developing and printing my own pictures, and the 620 film was easy to handle and contact print. I developed the film in a little plastic tank using Microdol-X or D-76 and contact printed the negatives. It was clearly time for an upgrade.

My Yashica was my first medium format camera

yashica

In about eighth grade, I bought a Yashica (probably using my paper route money): a pretty good quality twin lens reflex, using 120 film and still making 2 ¼” square negatives. The Yashica had a f 2.8 viewing lens which projected onto a ground glass screen for focusing, and a f/3.5 taking lens. This was my first camera that allowed focusing, as well as setting of the lens opening and shutter speed. This was a huge learning experience, and it was a good thing I could develop the film myself, because I ran through a lot of getting the hang of setting the exposure correctly. I used the Brockway incident light meter as well. And it was the first camera with decent resolution that allowed good enlargements.

The two knobs on the front controlled the lens opening and shutter speed, and the large knob on the side moved the two lenses in and out for focusing. The rear knob was for advancing the film. I don’t think there was an interlock to prevent double exposures, though. And there was no film advance that assured that you moved the film far enough. You had to look at the numbers on the back of the film paper that were displayed in the window on the back of the camera.

Around this same time, a took possession of a used enlarger much like the Kodak enlarger shown here, which really opening my vistas to making contact sheets, and making small enlargements on Kodak Medalist paper, developed in Dektol. This enlarger was a diffusion model, where the enlarger lamp is diffused through ground glass and passed through the negative and then to the enlarger lens.

practicefield

That Yashica was my main camera throughout high school. I used it for sports photography and group photos of all kinds.

Ventures into 35mm

minoltaAround this time, 1957 or so, 35mm cameras were getting better and cheaper and my father bought me a Minolta 35mm camera. I was soon taking so many candid pictures with it that I started spooling my own bulk film into 35mm cassettes. In those days, you could reuse standard Kodak cartridges, but Kodak put an end to that in about 1964 by crimping the ends so you had to use a bottle opening to pull them open.
The Minolta was only my second adjustable camera, where I took light meter readings and set the camera accordingly. The camera was well built, and I used it throughout high school for all my candid work for the yearbook. It did not feature interchangeable lenses, however.

It also introduced the possibility of color slides, which I dived into as well. And in fact, it turns out you can process your own Ektachrome, and I did that for some years to save money and for instant gratification. During high school, my friend Jeff Luce and I did some color film processing and printing (from 2 ¼” square negatives) It was a lot of fun, but took an awful lot of work. This did, however, give us a chance to crop and adjust the darkness if our photos.

Nikor

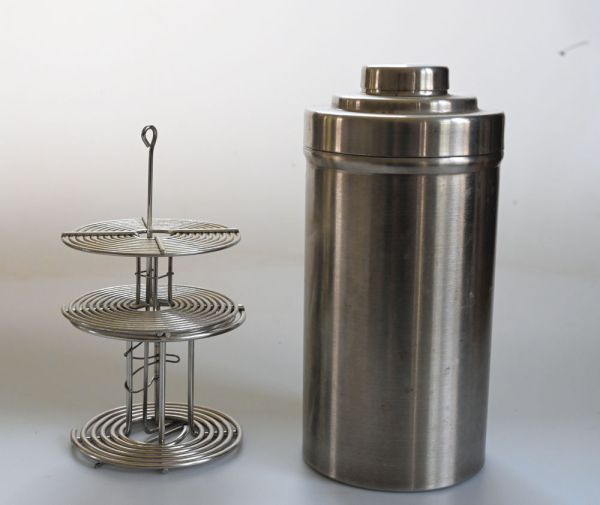
This was also about the time that I switched to the Nikor stainless steel film processing tanks that I still have and use. It takes a little practice to load them, but once you get the hang of it, they are very easy to load in the dark or even in a changing bag. This is probably now one of photography’s great lost skills! Sadly these tanks are no longer made, although other vendors have similar models.


The Kodak Retina

Retina

Around the start of the senior year in high school, the Minolta was not all it could be, and I looked around for a camera with sharper optics. I settled on the rather unique Kodak Retina IIc, a German made camera with an f/3.5 Schneider Xenon lens, and shutter speeds to 1/500th. It had a built in light meter and introduced (to me at least) the LVS or Light Value System, later called the EV or exposure Value system.

You matched a pointer to the light meter needle on the top of the camera, and that gave you a single LVS number. You set that LVS number on a wheel at the bottom of the lens, and it locked together all the f/stops and shutter speed combinations that would give you that exposure.

The Retina had a very sharp lens, rivalling the Nikons I later went to. While there were two additional lenses available: wide angle and short telephoto, they only replaced the front elements, not the whole lens and I never looked into them.

Later on that year, my father bought a Retina IIIc, which was the same camera with a f/2 lens, and that is the one pictured here. It still works very well.

I used the Retina IIc all through the rest of high school and nearly all of college as my camera for candids, and having joined the yearbook staff right away, I had access to a very good darkroom.

My Rolleiflex

Rolleiflex

In early January of my Senior year in high school, a friend of mine who worked at a local photo store called me to say that a used Rolleiflex had just come in that was in immaculate condition and I ought to get it immediately. My father worked near there and I called and asked him to take a look. He told me it had been sold, but didn’t tell me that he’d bought it for my birthday.

This was one highest quality cameras I’d ever had. It had a f/2,8 viewing lens and an f/3.5 taking lens and a film transport system that assured that the roll would always be advanced the correct amount. I used this all through my college career along with the Retina. And I had that camera for 40 years after that. It took outstanding photos.

Moving on to Nikons

Nikkorex

In my senior year in college, I wanted to move on to a camera with interchangeable lenses and high quality optics. Selling my Retina combined with a small early graduation present, I put together enough money to either buy a Nikon F or a Nikkorex F plus a Sigma 60mm-200mm zoom lens. They were about the same price. The Nikon F was a thoroughly professional-grade camera of its time, and the NIkkorex was intended for the amateur market. It had excellent Nikon optics but instead of the usual focal plane shutter, had a Copal Square metal blade shutter. I chose the latter because it seemed like a bargain to an impecunious college student.

When I got the Nikkorex, I found that that shutter was hardly silent and was roughly as noisy as a bear trap. Just the thing for shooting wedding ceremonies! Much later, I learned that this Nikkorex was sort of a joint project between Nikon and Mamiya, who actually manufactured the camera. That model was later sold by Ricoh, and Nikon went on to produce a number of Nikkormat cameras for the amateur market.

What can I say? It may not have been top of the line, but I used that Nikkorex all through graduate school and while raising a young family. It may have been a bit noisy, but the optical quality was very good.

Finally, a real Nikon


While teaching at Tufts, I wrote a number of books, and the royalties from my first book and second book enabled me to finally trade my Nikkorex in for a Nikon F3, one of Nikon’s most popular film cameras of all time. Of course, the Sigma zoom lens worked with the new Nikon just fine. I also managed to buy a new Beseler 23 C enlarger.

This Nikon F3 that I bought in 1980 was a workhorse camera for me for years: I didn’t seek to upgrade until digital cameras became more common in the early 2000s.  I still have it and it works just as well as the day I got it.

Replacing the Rollei

rollei 6003

By the early 2000s, my Rolleiflex was showing the signs of age. It just didn’t produce as sharp images as it once did, and it seemed ill-advised to spent money on repairing a 40 or more year old camera that was no longer made, so I sold it and bought a used single lens reflex Rollei 6008. This is a battery driven camera with through the lens metering and interchangeable 120 (or 220) film magazines, so you could switch from black and white to color, or between different film speeds mid-roll. The film advance was automatic, and while there were other lenses available for it, their prices were astronomical.

I took some photos with it recently and it remains an amazing machine: solidly build with incredible resolution. It is not autofocus, although Rollei did make a model that was at some exorbitant price. The producers of the Rollei line, Frank & Heidecke, went out of business in 2009 and Rolleis are no longer being produced, although there are a large number in the used market.

Frankly, this is a camera that only a tripod can love, since with the hand grip it weighs 79 oz or nearly 5 lbs. Its images are unsurpassed, however.

My journey into digital cameras

coolpix 995

In 2001, digital cameras became price accessible, although still of just moderate quality. My first digital camera was the Nikon e995 Coolpix which was really only suitable for making small pictures for a web site, with e megapixel resolution (2048 x 1536). Nonetheless, it was good for closeups and I used it for about 3 years.


The Nikon D70

Nikon d70

This was a 6 megapixel camera (2000 x 3008) that stood me in good stead for 4 years. It had a good zoom lens (18-70mm f/3.5-5.6) that was considerably more light sensitive than the previous Coolpix, and the lenses were interchangeable. I soon got a telephoto zoom(70mm-300mm) for it as well. And with that resolution, I could take good quality stage pictures easily.

bermuda d70

d70 sorc

The Nikon D80

Nikon d70

Four years later, I upgraded to the Nikon D80 to further improve resolution to 10 mexapixels (3872×2592), but kept the same lenses. This workhorse camera stood me in good stead for tens of thousands of pictures of all kinds. It was the first one that I felt I could make decent enlargements from and many of those are still hanging around our house.


Nikon D7200

d7200

I finally moved to a Nikon D7200 (24 megapixels) in 2017 and with it a new kit zoom lens, since the one I used with the D70 and D80 needed replacement from heavy use. But the 70-300mm telephoto remained in happy use. This was the first camera I’d had that would also do movies. It was a handy feature but I personally didn’t use it all that often. But the higher resolution was a great boon for landscape photography as well as stage photography.


The Nikon Z6

You would think that this should be the end of the story, but all of those digital cameras above used a 24 x 16 mm sensor, called DX format, while a full frame sensor would be 24 x 36 mm, or FX format. These full frame sensors can have the same number of pixels as the DX cameras and produce a much sharper image.

z6 and adapter

This year, Nikon introduced the Z6 (and Z7) cameras which had a full frame sensor and 24 megapixels (or 45 for the Z7). It is also a mirrorless camera that reduces vibration as well as the shutter sound since there is no mirror to flip out of the way. It has gotten very good reviews, included one I wrote comparing it to the D7200. However, Nikon also introduced a new Z lens mount and an accompanying adapter for recent older lenses, while they develop new Z-mount lenses.

This is simply the sharpest camera of any kind I have ever had, and an absolute joy to use. I haven’t been on any picturesque vacations yet using the Z6, but here is a lovely local picture that shows its sharpness.

Z^ scene

Conclusions

I wouldn’t be the photographer I’ve become without all those experiences, and starting at a young age was part of it. Only that way do you become entranced with the magic of film, seeing the prints and learning what works. And the magic of seeing prints develop in a darkroom tray is a thrill that few experience any more.

It’s easy to carry around your digital camera and never download or print any of those pictures, but that is a big mistake. The reward of beautiful prints is worth a little effort and is a big part of the learning experience that can make you a better photographer.

To some extent having a little digital camera in your phone bypasses all these steps and make photography seem routine. Again, starting young is still a step on the way to build confidence in your creativity and you should do your best to encourage young people to do more than take snapshots. And they should make some prints, too!

The new Nikon Z6 versus the D7200

The new Nikon Z6 versus the D7200

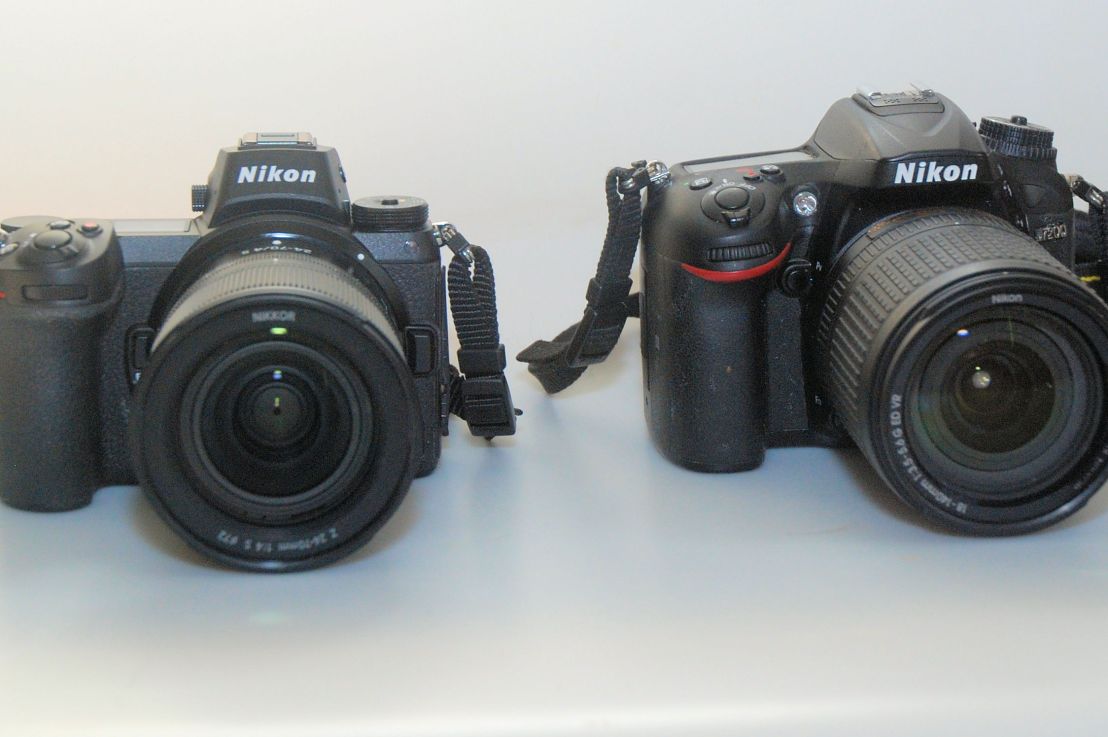
Nikon’s new Z6 camera is the first of their mirror less full-frame cameras. It’s nominally a 24 megapixel camera much like my recent D7200. But while the D7200 is a DX format with a sensor that is 24  x 16 mm. The new Nikon Z6 has a full frame sensor of 24 x 36 mm, but with the same megapixel resolution. Is it better or just more expensive? All reports seem to indicate that the larger, sharper pixels.

z6 and adapter

The Z6 is a camera you can enjoy handling. It is about 3 oz lighter than the D7200 (both with their default kit zoom lens) and much thinner. It is very easy to hold. Unlike the D7200, the Z6 has no built-in flash, but that is no great loss because the built in flash on all these cameras isn’t that great. But the flash connector works fine with my SB-800 flash.

Because the camera is mirrorless, the display and viewfinder are electronic and sharp as a tack. In addition, vibration reduction is built in, so you get a sharper picture by default than you could ever get in camera with a flip up mirror.

With the Z series (there is also a 45.7 megapixel Z7), Nikon has introduced a new Z lens mount that supplants the F mount of the past 40 years or so. The opening is a bit bigger, and the new technology it includes will allow lenses as sensitive as F/0.95.

The standard kit lens for the Z6 is a 24mm-70mm f/4 zoom lens, which seems very sharp indeed. By contrast, the D7200 comes with an 18mm-140mm f 3.5-5.6 zoom. Of course making these lenses is much cheaper for the DX area than for the full FX area.

Nikon also has introduced a $250 adapter for F-mount lenses (shown above), but only some of the most recent lenses seem to work with it. Neither of my fairly recent full frame lenses allowed autofocus to work, so look at the table of supported lenses before ordering it. Nikon has also released a roadmap of new lenses they will be introducing in the next 3 years.

The buttons and controls are very much like all my previous digital Nikons, so for the most part you will find it pretty easy to use. However, there are some exceptions.

Formatting the memory card is no longer something you can do by pressing two buttons at once: there just aren’t as many buttons on this camera body. But rather than hunting for the Format menu item, you can easily add it to your private menu favorites (My Menu) so you can find it more quickly. I usually copy photos to my PC about once a day and then format the memory card, so this is much handier.

I was surprised to discover that out of the box, there is no display of the photo you just took: the display goes live right away. If you want to look at your latest shot, you have to press the right-arrow button at the top left corner of the camera. There is a way to change this, however, using the Image Review menu item in the Playback menu. This took me quite a while to find, but after trying the setting both ways, I can see some advantages to each. For very rapid action shooting, that review is in the way, but if you are taking candids or covering an event where you need to make sure of your last shot, turning on Image Review will help.

The Z6 is also provides WiFi connection, which should allow you to transfer photos wirelessly. But like a number of other people who have tried this feature, I simply could not make it work. Fortunately, photos transfer very quickly using the provided USB cable. I now have 3 such USB cables: one for my D80, one for my D7200 and one for my Z6. So, when travelling be sure to pack all the cables you might need.

The display is bright, sharp and crisp, as is the viewfinder display, making you appreciate the quality of this camera’s features. However, this does have battery implications: you will probably have to change the battery every few days, while for the D7200, I could sometimes go a week or two between battery changes.  Fortunately, both cameras use the same charger and can use the same EN-EL15 batteries.

How sharp is it?

Below is a lovely shot I took in Martinique using our workhorse Nikon D7200. Can the Z6 do any better?

hillside mart.jpg

Well, not having another trip planned, I decided to do a couple of local tests. Below is a forest scene near our house.

z6trees full

I took the same shot at about a 50mm focal length with both cameras, with aperture priority set to f/11, using the same autofocus settings. At full frame the two pictures look pretty identical. You can see them at full resolution here for the D7200 and here for the Z6. Below, are details from both shots. It is pretty clear that the Z6 is much more detailed.

Nikon D7200        ——-    Nikon Z6

And what about our dog Edward?

bigz6dog

Here he is full frame, and here he is in details from both cameras. No question that the Z6 is much sharper. Of course he dozed during  D7200 shot and that could be why he looks “less sharp.”

Nikon D7200  —–     Nikon Z6

Having used the camera for about a week now, I am really impressed with the incredibly sharp pictures in the viewfinder, on the display and expanded on my laptop. It is the sharpest digital camera I have ever had and I plan to keep it.

Photo notes: Pictures of the two cameras (Z6 and D7200) were taken with my 10 megapixel D80. Pictures of the Z6 were taken with the D7200.

Oh, and incidentally, the Z6 uses only relatively expensive XQD memory cards, and the package (camera plus lens) does NOT include a memory card. Make sure your order includes one!